Big Red cosplay process
- Spoeks

- 19 jun 2024
- 5 minuten om te lezen
Welcome to another cosplay blog post! Today, I'm thrilled to share a tutorial that I assume many of you have looked forward to: my Anastasia's Big Red cosplay! From the first time I posted this cosplay in 2019 till this very day in 2024, this one is a favorite among my followers. So, without further ado, let's get started! :)


The first piece of clothing I created for this cosplay was the 'base' skirt. For this skirt, I chose a stunning red and gold brocade fabric. I then created a simple A-line skirt using this brocade:
Measure your waist and desired skirt length. Add an extra inch for the waistband and hem allowances.
Use a simple A-line skirt pattern or create your own by cutting two 'A' shapes from the fabric. The top of each 'A' should match your waist measurement divided by two, and the bottom should flare out to your desired width. I don't quite remember the measurement I used for the bottom, since I personally just eyeballed it.
As the second step I hemmed the waist and the bottom, but you can also do this step at the end if that's what you prefer.
Pin the two pieces of fabric together with the right sides facing each other. Then sew them together, but leave an opening for the zipper at 1 side.
Then insert the zipper at the opening. There are many online tutorials available that provide detailed instructions on how to insert a zipper if you're not familiar with inserting zippers jet. A red invisible zipper would be your best option.
Glue or sew on the beads. I used glass because I think it's prettier then plastic, but not as expensive as gemstones.

Since i couldn’t find any patterns that I liked i drafted my own. To do so i made 4 lines: one for the top measurement, one dor my chest measurement, one for my waist and one for my hips. I also measured the distance between All those. I then connected them together. And diveded it into different tabs. It’s pretty hard to explain and I had No clue if this would work, I just did Some math and hoped it worked out fine. I never learned to draft patterns, but as we all know it did turn out to be wearable. However, I don't think I would do this method again, I think my pre-bought patterns fit me a whole lot better then this one. The skirt is basicly a pleated circle skirt with a split in the front.

Since I wasn't sure if my self-drafted pattern would work, I made a mock-up first. This is a crucial step to ensure that the final dress will , well, actually looks like a dress. And even though the skirt looked fine, the bodice definetely needed some touch ups. So i marked it down and tried again.

To achieve the silhouette of Anastasia's dress, I created a pannier / pocket hoops as the second skirt. These structured undergarments help to support the outer layers and give the dress its iconic silhouette (and the name big red). There are also tutorials for this online wich can explain making these a lot better then i can. I added ruffles to them like the original has and used steel boning for support. The ruffles are made with pleating strips of satin fabric, wich all have been finished using my serger. The base of the pannier is made out of a 100% cotton fabric.

Here's a quick photo of the panniers (pardon my sloppy attire!):
Finished look of the second skirt! Tried them on quickly and i accidently put them on too high, but you can see that they do give the correct shape. Please ignore my sweatpants, I had just taken a shower and was to lazy for actual clothing lol.
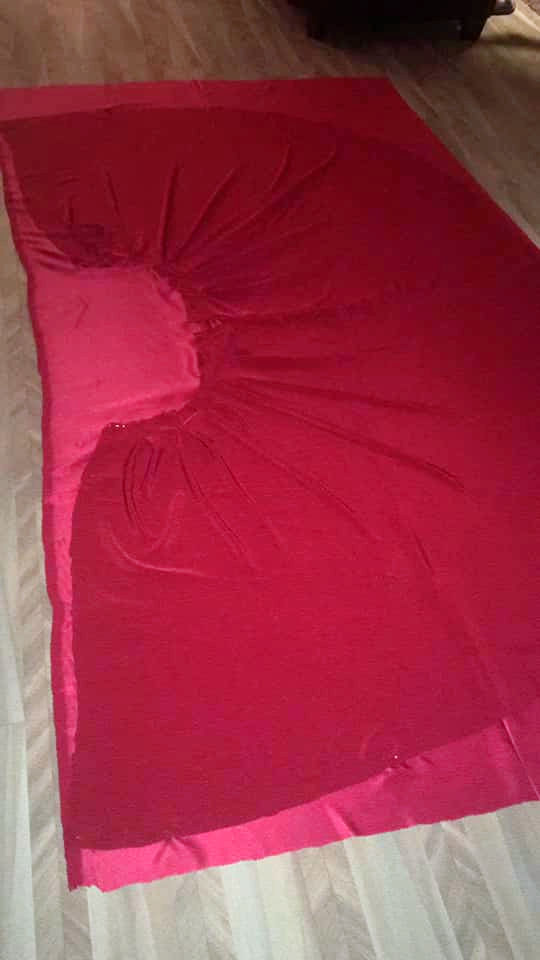
After preparing the base skirt and panniers, the next step was to create the outer skirt. Using the pattern that I had made for the mock up, I first cut out the fashion fabric. Then I added the box pleats onto the fashion fabric at the places that I had marked on the fabric/mock up. I then layed the pleated skirt on the lining fabric and traced it. And with that I could cut out the lining fabric (wich is a polyester fabric btw, the same as that I used for the ruffles of the panniers).

I pinned horsehair braid to the right side of the lining. This is applied to the edges that will not be attached to the bodice, with wich I mean the bottom of the skirt and the sides of the split.


After sewing one side, fold it inward to create a hem. Stitch the hem along with the top of the horsehair braid to the fabric.

I will cut 6 long fabric straps for the ruffles in the lining. The actual amount of layers in the official productions are different in every production as far as I could see, so the decision on how many layers you want is yours. Personally, I assumed that 5 layers would provide a nice amount of flounce.

I purchased a secondhand serger (from Marktplaats). After experimenting with it on fabric scraps to understand its operation, I began finishing all edges of the fabrics I'll use for the ruffles. Before owning a serger, I always had to sew hems, which took me a lot of time. This method is much faster!

I've pinned on the first layer of ruffle fabric. I will sew it onto the lining and then proceed with the other rows. It's a pain in the neck, quite literally! You can also choose to gather your strips of fabric before pinning them on instead of making box pleats. That's up to you.


I also made a small bum pad which will also be covered with ruffles. It's quite simple to make: just cut out two pieces of fabric (I rounded the corners), sew the sides together leaving a gap, turn it inside out, stuff it with fiberfill, and then sew the gap closed.

Combine the fashion fabric bodice with the bodice lining, ensuring the rigilene is included in the lining for strenght. Sew them together as you would typically do. Then, attach the bodice to the (3rd, outer) skirt.
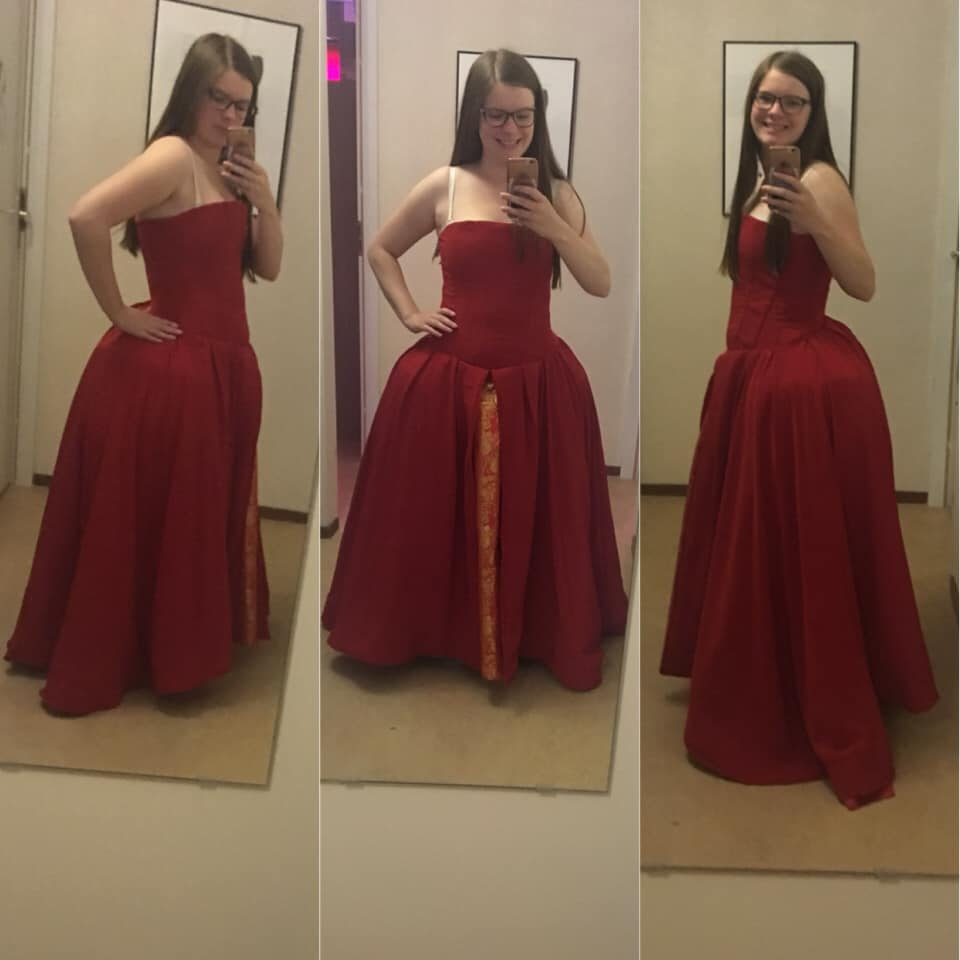
Sew and try it on before beginning any decorating, just in case. Mine turned out a bit too big at the waist, but I think I'll keep it this way anyway—it feels comfortable, which is also very important.


I've ordered several golden lace appliques which I'll be cutting and piecing together until I achieve a pattern I like. I've created a digital collage of my idea for this on the computer.
I bought them from here:
Gold applications Big Red: ��https://nl.aliexpress.com/item/1403235551.html... (1x) �https://nl.aliexpress.com/item/32247213282.html... (1x) �https://nl.aliexpress.com/item/32775780970.html... (1x) �https://nl.aliexpress.com/item/32848971023.html... (2x) �https://nl.aliexpress.com/item/32900730998.html... (1x) �https://nl.aliexpress.com/item/33021058103.html... (3x)


Then, I pinned the appliques to the skirt. When I figured out the placement on 1 row, then I will continue on the same placements on the other pleats. When I was happy with how it looked, I ironed down the appliques to the skirt.


Then I did the same for the bodice: First, I pinned down the appliques, and when I was happy with it I ironed them down.
I'm going to hand-sew on the glass beads. This will be time-consuming, as there are almost 650 glass beads to attach!

After careful consideration, I decided to change the dress's back closure. I removed the zipper, adjusted the back panels slightly smaller, and added eyelets for a corset closure. Additionally, I sewed in a piece of fabric for modesty reasons, ensuring my skin will not show through the corset lacing.
And with that, the dress is finished! I'd like to extend my thanks to adnil_cosplay, who generously shared a lot of reference photos with me. Their help was invaluable in creating this cosplay!
I hope this post was helpfull , or at least entertaining, for you. Happy sewing!


Opmerkingen