Glinda Bubbledress cosplay tutorial
- Spoeks

- 8 dec 2024
- 5 minuten om te lezen
With the excitement surrounding the Wicked movie, I thought now would be the perfect time to look back on my cosplay of Glinda's bubble dress from the Wicked stage musical.
Creating this dress was quite a journey, and it was probably a bit beyond my skill set at the time. It was one of my very first cosplans, and it took about five years to complete. Over the course of those years, I learned so much, and in hindsight, there are definitely things I’d do differently if I were to make it now. But somehow, everything worked out in the end, and in true Glinda fashion: "I couldn’t be happier!"
This tutorial will cover the most important information you need to recreate the dress, but if you want extra, more in-depth details, you can support me on Ko-fi. For just €1, you’ll be added to my Instagram Close Friends list (don't forget to mention your username in the message section when you donate!), where you’ll get access to an additional tutorial for Glinda’s wand and more detailed info on the skirt petals, sleeves and petticoat. But don’t worry—this free tutorial will provide everything you need for the basics!
Without further ado, let’s make a Glinda costume!

Photo by Taro Fotografie

Before making the dress itself, I needed to create a hoopskirt as a foundation to achieve the right silhouette. I made an elliptical crinoline using the TV103 pattern from Truly Victorian. It was probably the most expensive part of the cosplay, material-wise, and it was also quite time-consuming to make. However, this step is essential to get the volume you'll need for the dress.
Unfortunately, I didn’t take step-by-step photos of this process, as this was a new technique for me as well. However, the pattern includes clear instructions that you can follow to make it yourself.

I used the book Patterns of Fashion 2 by Janet Arnold to get the pattern for the base skirt. First, I made a mock-up using a cheaper light blue fabric. This mock-up ended up being repurposed as one of the petticoats, so it turned out to be quite multifunctional!

In the photo above, you can see the mock-up skirt with paper petals pinned onto it. I did this to determine the correct size for the petals without sacrificing the fabric.

Next, I made the actual skirt out of satin fabric and used satin bias tape to finish the hemline.

I did the same to create the waistband for the skirt.

Next, I take the base skirt layer and sew the top petals onto it before closing the skirt, adding the zipper, and attaching the waistband. This ensures that later, the petals will be tucked under and hidden by the waistband.

After attaching the top petals, I added the waistband and the zipper, and then sewed the rest of the skirt closed.

And then... we come to the most time-consuming part (which might drive you insane, not gonna lie) of this cosplay: handsewing the sequins onto the petals.

In the photo above, you can see an example of what a finished petal looks like.

Photo by Rosa.Rem.Clicks Once all the petals are sewn onto the skirt, it will be finished!
If you'd like more in-depth information about making the petals (or want to see how I made the petticoat), consider donating to my Ko-Fi (https://ko-fi.com/spoeks). With a €1 donation, and by leaving your Instagram username in the message, you'll be added to my Close Friends list on @Spoeks & @Spoeksy. On @Spoeksy, you’ll find exclusive Glinda content in my highlights.
Next up: the bodice!

For the bodice, I used Simplicity 1026, from the Disney Cinderella collaboration, as my pattern. I chose to include a zipper in the back for this project, as it would allow me to dress myself and get changed more quickly. If that’s not important to you, you can also opt for a corseted pattern, like Nikita Cosplay's Princess pattern or Delores from Aranea Black, for example.

The outer fabric is satin, which frays like crazy, so I’m leaving some extra seam allowance. I’ll finish the edges with my serger. While it isn’t strictly necessary, I think it will make the satin easier to work with.

Since the satin is a rather thin and flimsly fabric, I'm going to add some iron-on interfacing to give it some extra strenght and structure.

My next step is to cut out the lining.

If you spot any wrinkles, iron them out. It’s easier to do this now than once everything is sewn.

Sew the fashion layers of the bodice pieces together.

Start sewing on the sequins before adding the lining for a clean finish on the inside. However, make sure to stay clear of your seam allowance, and leave a tiny bit of extra space just in case.

Next, sew your lining pieces together and insert your boning (I used rigilene, but I think zip ties might work better). I also added the lacing and piping so they’ll be tucked neatly and cleanly between the layers of fabric once we sew them together.

Once you’ve sewn the fabric layer and lining together and turned them right side out, insert your zipper.

Continue hand-sewing the sequins onto the bodice in the open spaces you left clear for the seam allowance.

The sleeves are basically just two rectangles.

Start decorating the sleeves by adding sequins and pleated organza.

If you then sew the lining for the sleeve to the fashion layer, right sides together, and turn it right side out, you should get a piece that kind of looks like a fancy worm. In this "worm," you’ll want to add elastic between the layers (at the top) and then sew it to the bodice. Now you have cute sleeves that are also easy to move in! :)

In the photo above, made by Lizzie_Clicks, you can see how the elastic gathers the sleeve to your size, while it expands to the needed size when you move your arm.
But as you can see, the Glinda cosplay isn’t just a hoop skirt, petticoat, skirt, and bodice—she has accessories too! The wand tutorial is Ko-Fi exclusive (https://ko-fi.com/spoeks; again, don't forget to add your Instagram username to get access). HOWEVER, I will show you how I made her necklace and crown. So buckle up, this blog post isn’t quite over yet!

The necklace is made of three strands of wire. I decorated the middle strand with round beads in shades of blue and silver.

The outer strands are decorated with these blue, longer, flatter beads.

Then, I used blue and silver glass stones to create the centerpiece for the necklace. Once this is done and a necklace closure is added to the back, the first accessory is finished!

The base of the crown consists of five fabric circles, stiffened with textile hardener: two small ones, two slightly bigger ones, and one that’s even larger.

First, I attached thin wires to the large circle: one large wire to secure it to the crown base, and eight smaller ones for decoration. I added beads to the decorative wires. This is a photo of the backside.

I started sewing on some beads (this is the largest circle).

I used fabric glue to attach some rhinestones and star-shaped glitter.
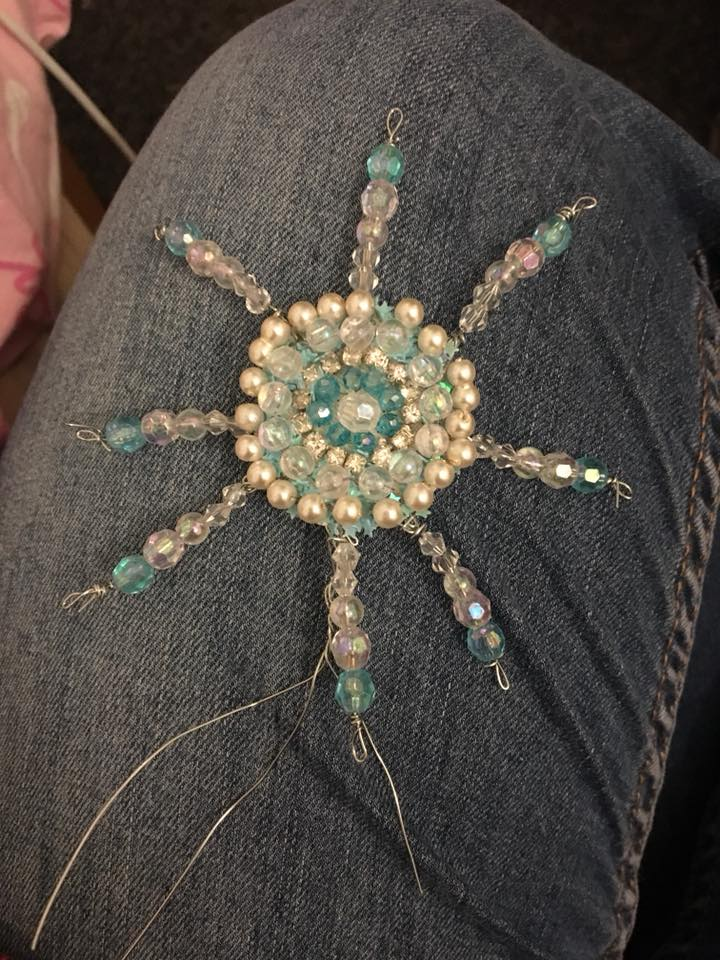
I sewed on additional beads to complete the look.

With the long wire, I attached the star to the crown. Now, only four more to go!


Then, I will use the same techniques to make the medium and small stars as well.


And once you’ve attached all the stars to the crown, you’re done!
You’ll want to wear a corset underneath to distribute the weight. You can make one yourself or buy one from a reputable store, like RedThreaded or Corset-Story. Make sure the corset is of high quality and steel-boned. Corsets from stores like Shein, Primark, or AliExpress won’t provide the support you need.
And of course... Happy sewing and cosplaying!If you’d like to see more of my cosplays, don’t forget to follow me on Instagram, and if you make a cosplay using one of my tutorials, feel free to tag me. I’d love to see the result!


Opmerkingen